


")

")
You’ve tried making iced mocha at home before. The first sip tasted fine, but halfway through the glass it turned into sad, watery chocolate milk. Meanwhile, the Starbucks version stays creamy until the last drop, and you’re left wondering what went wrong.
The difference isn’t magic—it’s technique. Most homemade iced mocha recipes skip the crucial steps that prevent dilution and weak flavor. This recipe fixes those problems with methods that actually work, using ingredients you already have. No espresso machine required.
Why Most Homemade Iced Mochas Taste Watery
The main culprit is regular ice cubes. As they melt, they dump plain water into your carefully balanced coffee and chocolate mixture. Within ten minutes, you’re drinking diluted disappointment.
The second issue is temperature. Pouring hot coffee directly over ice creates rapid melting and immediate dilution. Some recipes tell you to do exactly this, which guarantees a watery result.
The fix involves two simple changes: using coffee ice cubes instead of regular ones, and letting your brewed coffee cool to room temperature before assembly. Coffee ice cubes maintain flavor strength as they melt, since you’re essentially adding more coffee rather than water.
If you don’t have time to freeze coffee cubes, you can make a concentrated brew using double the normal amount of grounds. This compensates for the dilution from regular ice.
Ingredients for Perfect Iced Mocha
You need five basic ingredients. The quality of each one matters, but nothing here requires a specialty store trip.

Strong brewed coffee (6 ounces): Regular drip coffee works fine if you use a higher coffee-to-water ratio than normal. Cold brew delivers richer flavor with less bitterness. Instant coffee is acceptable—dissolve 1 tablespoon in 2 tablespoons of hot water, then add cold water to reach 6 ounces.
Chocolate syrup (2 tablespoons): Standard Hershey’s syrup is what most coffee shops use. For deeper chocolate flavor, try chocolate sauce instead, which has a thicker consistency and less corn syrup. Cocoa powder mixed with simple syrup works as a substitute, but it requires more stirring to prevent clumping.
Milk (1 cup): Whole milk creates the creamiest texture. Two percent works but tastes slightly thinner. For dairy-free versions, oat milk mimics the creamy mouthfeel of dairy better than almond or soy. Half-and-half makes an extra indulgent version but adds significant calories.
Ice cubes (1 to 1.5 cups): Coffee ice cubes are ideal. Regular ice works if your coffee is concentrated or fully cooled.
Whipped cream (optional): This is traditional but not required. If you skip it, consider adding an extra tablespoon of milk for body.
For dairy-free iced mocha, swap regular chocolate syrup for a vegan brand like Santa Cruz Organic, and use oat or coconut milk. Many standard chocolate syrups contain dairy derivatives even though they look plant-based.
Step-by-Step Instructions
This method doesn’t require a shaker, blender, or frother. Just a glass and a spoon.
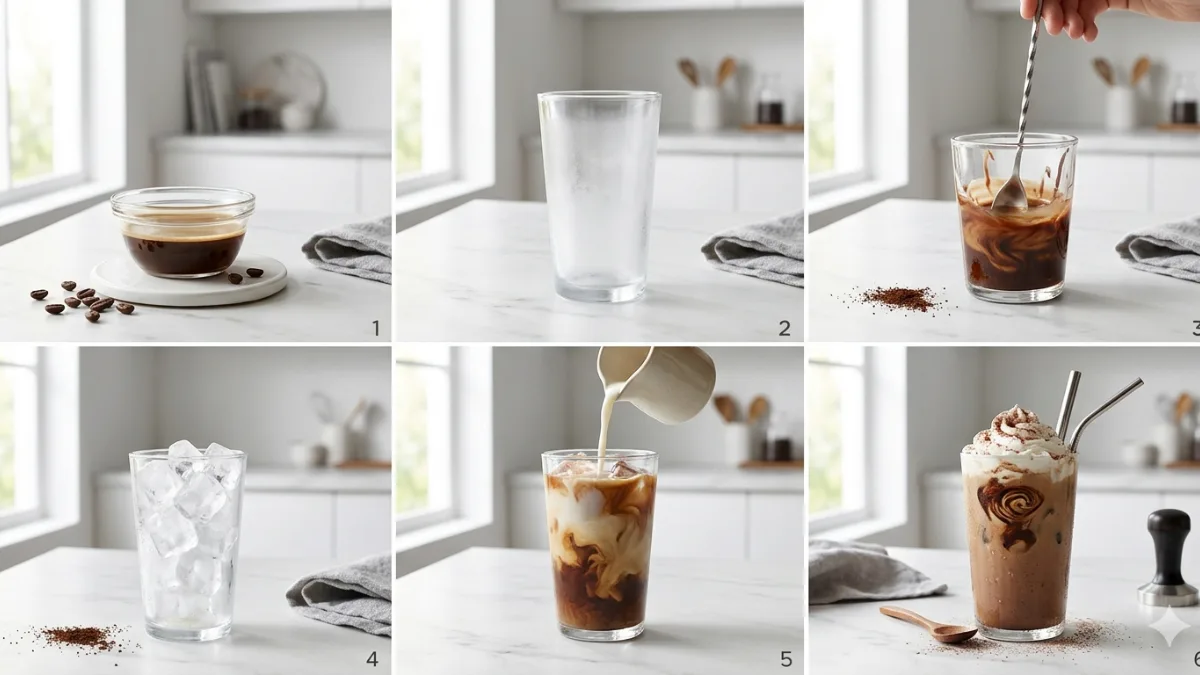
Step 1: Brew and cool your coffee. Make 6 ounces of strong coffee using 2 tablespoons of grounds instead of the usual 1 tablespoon. Let it cool to room temperature, or refrigerate for 30 minutes. If you’re in a hurry, spread the hot coffee in a shallow bowl—it cools faster with more surface area exposed.
Step 2: Prepare your glass. Use a 16-ounce glass. If you have time, chill it in the freezer for 10 minutes. This keeps your drink colder longer without requiring extra ice.
Step 3: Mix chocolate and coffee. Pour the cooled coffee into your glass. Add 2 tablespoons of chocolate syrup. Stir vigorously for 15 seconds until completely combined. The chocolate should distribute evenly with no streaks on the bottom.
Step 4: Add ice. Fill the glass with ice cubes, leaving about an inch of space at the top. Coffee ice cubes are best, but if using regular ice, add them now before the milk.
Step 5: Pour milk. Slowly pour 1 cup of cold milk over the ice. The slow pour creates natural layering that looks appealing. If you want a uniform color, stir gently after pouring.
Step 6: Finish and serve. Top with whipped cream if desired. Drink immediately for best texture, or within 20 minutes if using coffee ice cubes.
Tips That Actually Improve Your Drink
These aren’t generic suggestions—they solve specific problems that come up when you make this repeatedly.
Make coffee ice cubes in advance. Brew a full pot of coffee, let it cool, and pour it into ice cube trays. One tray gives you enough for four drinks. They last three months in the freezer.
Adjust chocolate intensity to your preference. Start with 2 tablespoons of syrup. If it tastes too subtle after your first sip, add another tablespoon. Chocolate flavor fades as ice melts, so slightly over-sweetening at the start compensates.
Froth your milk if you have a frother. This adds air and creates a texture closer to what coffee shops serve. Pour the frothed milk slowly over the ice so the foam sits on top. If you don’t have a frother, shake cold milk in a sealed jar for 30 seconds—it creates temporary foam.
Use a wider glass instead of a tall narrow one. This reduces the height of your ice column, which means less melting pressure on the bottom cubes. Your drink stays consistently flavored from top to bottom.
Skip the straw for the first few sips. This lets you taste the layered flavors before they fully mix. Once you’re satisfied with the initial taste, stir everything together.
Three Iced Mocha Variations
Once you’ve mastered the basic version, these variations take about the same effort but deliver completely different flavors.
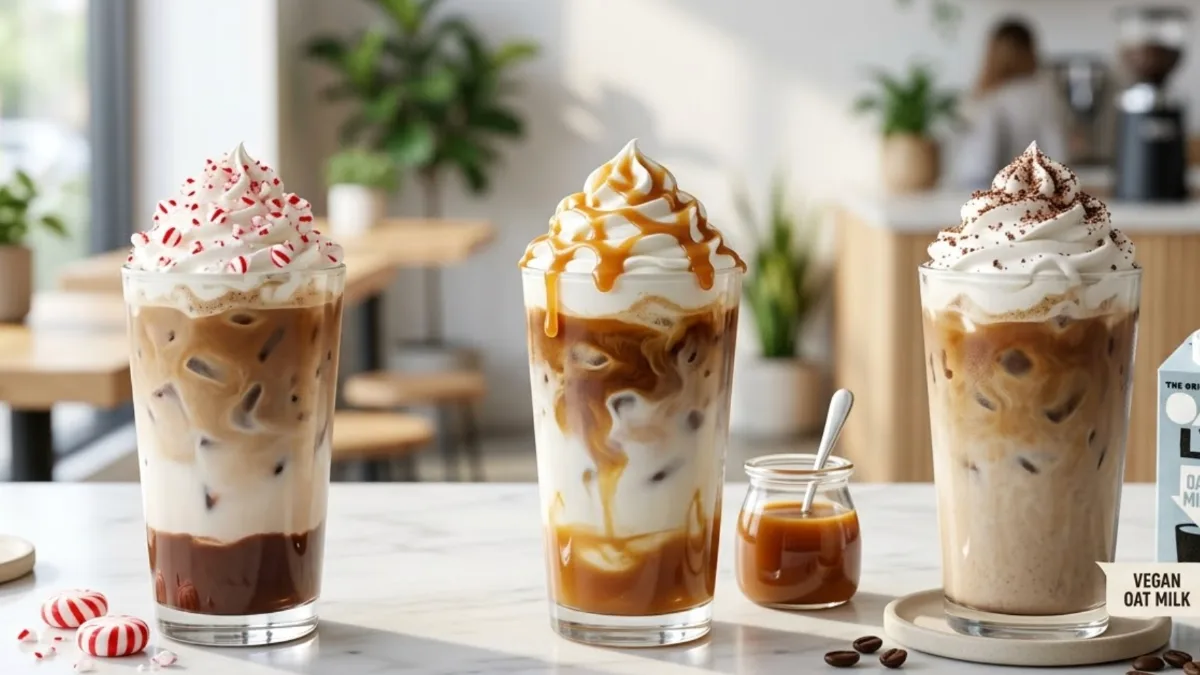
Peppermint Iced Mocha: Follow the base recipe, but add 1/4 teaspoon of peppermint extract when you mix the chocolate syrup with coffee. Don’t use more than 1/4 teaspoon—peppermint extract is potent and can quickly taste medicinal. Top with whipped cream and crushed peppermint candies if you want the full holiday coffee shop experience.
Caramel Mocha: Use 1 tablespoon of chocolate syrup and 1 tablespoon of caramel sauce instead of 2 tablespoons of chocolate. Mix both into the cooled coffee before adding ice. Drizzle extra caramel sauce on top of the whipped cream. The salt in salted caramel sauce works particularly well here, balancing the sweetness.
Vegan Iced Mocha: Use dairy-free chocolate sauce (check labels carefully—many contain whey). Replace milk with oat milk for the creamiest result, or coconut milk for subtle tropical notes. Make coconut whipped cream by refrigerating a can of full-fat coconut milk overnight, then whipping only the solid cream that separates. This version has 30% fewer calories than the dairy version.
How This Compares to Starbucks
Understanding what you’re getting versus the coffee shop version helps you adjust the recipe to match your preferences.
| Factor | Homemade (This Recipe) | Starbucks Grande Iced Mocha |
|---|---|---|
| Caffeine | 70-100mg (varies by coffee strength) | 175mg (from espresso shots) |
| Calories | 180-220 (with whole milk, no whip) | 350 (with whole milk and whip) |
| Cost per serving | $0.75-$1.25 | $5.45-$6.25 |
| Prep time | 5 minutes (plus cooling time) | 5-15 minutes (including line wait) |
| Customization control | Complete | Limited to menu options |
The caffeine difference is significant. If you want closer to Starbucks levels, brew 8 ounces of coffee instead of 6, or add a shot of espresso if you have access to one. Some baristas recommend doubling the coffee for people transitioning from espresso-based drinks.
The calorie savings come mainly from using less chocolate sauce and controlling your milk choice. Starbucks uses a pre-made mocha sauce that’s heavier than standard chocolate syrup.
Making Iced Mocha in Batches
If you drink this regularly, batch preparation saves time without sacrificing quality.

Mocha concentrate for four servings: Brew 24 ounces of strong coffee using 8 tablespoons of grounds. Let it cool completely, then stir in 8 tablespoons of chocolate syrup until dissolved. Store this concentrate in a sealed container in the refrigerator for up to five days.
When you want a drink, pour 6 ounces of concentrate over ice and add 1 cup of milk. This method ensures consistent flavor across multiple servings and eliminates the daily mixing step.
Freezer method: Pour the mocha concentrate into ice cube trays. Each cube equals roughly one ounce. For a single serving, use 6 mocha cubes plus regular ice to fill your glass, then add milk. The cubes melt slower than regular ice while maintaining full flavor.
Don’t pre-mix the milk into your batch. Milk separates and develops off flavors when frozen or stored for more than 24 hours with coffee.
Common Questions
Can I make this with cold brew instead of regular coffee?
Yes, and many people prefer it. Cold brew has lower acidity and a naturally sweeter taste, which means you might use less chocolate syrup. Use the same 6-ounce measurement, but skip the cooling step since cold brew is already chilled.
What if I only have instant coffee?
Dissolve 1 tablespoon of instant coffee in 2 tablespoons of hot water, stirring until no granules remain. Add 4 ounces of cold water and proceed with the recipe. The flavor won’t be as complex as brewed coffee, but it works when you need speed.
How do I make this into a blended frappuccino-style drink?
Combine all ingredients except whipped cream in a blender with 1 cup of ice. Blend on high for 30 seconds. For thicker consistency, add 1/4 teaspoon of xanthan gum before blending—this is what coffee shops use to prevent separation.
Can I convert this to a hot mocha?
Heat your milk in the microwave or on the stovetop until steaming but not boiling. Mix hot coffee with chocolate syrup in your mug, then pour in the hot milk. Top with whipped cream. Skip the ice obviously.
What’s the best dairy-free milk for this?
Oat milk creates the closest match to whole milk’s creamy texture and slight sweetness. Almond milk works but tastes thinner. Coconut milk adds tropical flavor that some people love and others find distracting. Avoid rice milk—it’s too watery for this application.
How long does this stay good in the refrigerator?
The assembled drink doesn’t store well because the ice melts and dilutes everything. However, you can refrigerate the coffee-chocolate mixture (before adding milk and ice) for up to three days. Add fresh milk and ice when you’re ready to drink it.
The cost savings add up faster than you’d expect. If you currently buy iced mochas three times per week at $5.50 each, switching to homemade saves roughly $700 per year. That’s enough to justify buying really good coffee beans and still coming out ahead.

")
